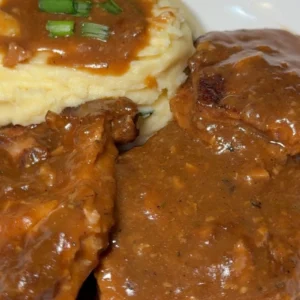
Southern Smothered Pork Chops with Brown Gravy
Tender, golden pork chops swimming in rich brown gravy that begs to be spooned over a mountain of mashed potatoes. This is the kind of Southern comfort food you make when you want everybody asking for seconds.
Equipment
- Large heavy-bottomed skillet or sauté pan for browning the pork and making the gravy
- Large oven-safe roasting pan with lid, large enough to hold 12 pork chops in a mostly single layer
- Large mixing bowl
- Medium mixing bowl
- Large measuring cup or pitcher
- Shallow dish for dredging
- Whisk
- Wooden spoon or silicone spatula
- Tongs
- Instant-read meat thermometer
- Cutting board
- Chef's knife
- Paper towels
- Large baking sheet or tray
- Wire rack, optional
Ingredients
Pork Chops and Overnight Dry Brine
- 12 thin-cut bone-in pork chops about 4½ to 5½ pounds total, preferably ½ to ¾ inch thick
- 2 teaspoons kosher salt divided
- 2 teaspoons garlic powder
- 1½ teaspoons onion powder
- 1½ teaspoons paprika
- 1 teaspoon freshly ground black pepper
- ½ teaspoon white pepper
- ½ teaspoon dried thyme
- ¼ teaspoon cayenne pepper optional
- Seasoned Flour
- ½ cup all-purpose flour about 60 g
- ½ teaspoon reserved pork seasoning
- ¼ teaspoon freshly ground black pepper
- ¼ teaspoon white pepper
For Browning the Pork
- 3 tablespoons neutral cooking oil such as canola oil, divided
- 1 tablespoon unsalted butter about 14 g, optional
Southern Brown Gravy
- ⅓ cup neutral cooking oil or reserved pork drippings about 75 g
- ⅓ cup all-purpose flour about 43 g
- 1 medium yellow onion thinly sliced (about 150 g)
- 4 cloves garlic finely minced (about 12 g)
- 9 cups water divided
- 1 cup McCormick Brown Gravy Seasoning Mix
- 1½ teaspoons roasted chicken Better Than Bouillon divided
- 1 teaspoon freshly ground black pepper
- ½ teaspoon white pepper
- ½ teaspoon dried thyme
- ¼ teaspoon paprika
- 1 tablespoon Worcestershire sauce
- 1 tablespoon unsalted butter about 14 g
- Kosher salt only if needed after tasting
Optional Finishing Touch
- 1 to 2 tablespoons fresh parsley or green onions finely chopped, for serving
Instructions
Start the Flavor Party: Make the Dry-Brine Seasoning
- In a small bowl, combine 2 teaspoons kosher salt, 2 teaspoons garlic powder, 1½ teaspoons paprika, 1 teaspoon freshly ground black pepper, ½ teaspoon white pepper, ½ teaspoon dried thyme, ¼ teaspoon cayenne pepper, if using, and 1½ teaspoons onion powder. Stir until everything is evenly combined. This is our master seasoning blend. The salt is doing more than making the pork taste seasoned. Giving it several hours to work into the meat helps the chops retain moisture during cooking while seasoning them beyond the surface. Reserve ½ teaspoon of the finished seasoning blend for the flour.
Season the Pork Like You Mean It: Dry-Brine Overnight
- Pat all 12 pork chops thoroughly dry with paper towels. Lightly season both sides of each chop with the remaining seasoning mixture, using an even dusting rather than a thick coating. Arrange the pork chops in a single layer on a large baking sheet or tray. If you have room, place them on a wire rack set over the tray so air can circulate around them. Loosely cover and refrigerate for 12 to 20 hours. This is our first tenderness trick. The salt gradually moves into the meat rather than sitting only on the surface, helping the pork stay moist and flavorful. Important: Check the pork package before doing this. If the chops are labeled “enhanced,” “seasoned,” “marinated,” or say they contain an added solution, the pork already contains salt and the dry-brine amount needs to be reduced.
Get Your Kitchen Together: Prep Before You Cook
- Before you start cooking, measure out the flour, gravy mix, Better Than Bouillon, seasonings, and water. Thinly slice the onion and finely mince the garlic. Measure the 9 cups of water into a large pitcher, keeping 2 cups separate from the remaining 7 cups. Also make sure your oven is ready to go and that your roasting pan and lid are confirmed oven-safe at 325°F. This little bit of organization will make the actual cooking much smoother.
Preheat Like a Pro: Get the Oven Ready
- Preheat the oven to 325°F. We’re going to use the stovetop to develop all the deep browned flavor, then let the oven handle the gentle, covered braising. This is the best of both worlds.
Bring the Pork Out: Take the Chill Off
- Remove the pork chops from the refrigerator about 25 to 30 minutes before cooking. Place them on a clean tray and gently pat the surface dry if they look damp. Do not rinse the pork. We’re keeping all that carefully developed seasoning right where it belongs.
Make the Seasoned Flour: Lightly Does It
- In a shallow dish, whisk together ½ cup all-purpose flour, ½ teaspoon of the reserved pork seasoning, ¼ teaspoon black pepper, and ¼ teaspoon white pepper. Mix thoroughly. The flour should create a thin, even coating. We’re not making fried pork chops with a thick crust. We want just enough flour to help create beautiful browning and contribute flavor and body to the gravy.
Heat the Skillet: This Is Where the Flavor Starts
- Place a large heavy-bottomed skillet over medium to medium-high heat and add about 2 tablespoons canola oil. If using the optional butter, add 1 tablespoon once the oil is hot. The butter should melt and foam without becoming dark brown. You want the pan hot enough that the pork immediately sizzles when it hits the surface. If the oil is smoking aggressively, lower the heat. We’re looking for hot, not hazardous. 😂
Dredge the Pork: Thin and Even
- Lightly coat both sides of each pork chop in the seasoned flour, then shake off the excess. You should still clearly see the pork underneath the flour. If it looks like the chop is wearing a winter coat, we’ve gone too far. Set the dredged chops on a tray while you finish the rest.
Brown the Pork: Build That Flavor Bank
- Place the first batch of pork chops into the hot skillet, making sure not to overcrowd the pan. Cook the first side for about 2 minutes, then carefully peek underneath. You’re looking for a deep golden-brown crust with darker brown spots. Beautiful golden brown is the sweet spot. Flip and cook the second side for another 1½ to 2 minutes. The pork does not need to be cooked through yet. Transfer the browned chops to a clean tray and repeat with the remaining pork, adding more oil as needed. Do not clean the skillet. Those browned bits on the bottom are flavor gold. We’re about to turn every last one into gravy.
Build the Aromatics: Onion, But Not Onion Gravy
- Reduce the skillet heat to medium. You want about 2 to 3 tablespoons of fat remaining in the skillet, so add a little more canola oil if necessary. Add the sliced onion and cook for 5 to 7 minutes, stirring frequently, until the onions are soft, translucent, lightly golden around the edges, and fragrant. Do not deeply caramelize them. We want tender pieces of onion throughout the brown gravy, but the gravy itself should still taste like rich brown gravy first, not onion gravy.
Add the Garlic: Give It 30 Seconds
- Add the minced garlic and cook for 30 to 45 seconds, stirring constantly. The garlic should smell fragrant and savory. Don’t let it turn dark brown. Burnt garlic can make the entire gravy bitter, and we have worked too hard to let one little clove cause drama. 😂
Make the Southern Roux: Give That Gravy Some Body
- Push the onions and garlic toward the sides of the skillet. Add enough canola oil or reserved pork drippings to bring the total fat in the skillet to approximately ⅓ cup (about 75 g). Sprinkle in ⅓ cup all-purpose flour and immediately whisk the flour into the fat. Cook the roux for approximately 3 to 5 minutes, stirring constantly, until it reaches a warm peanut-butter-to-caramel color. It should smell lightly nutty and toasted, and you should no longer see raw white flour. Do not take it all the way to dark chocolate brown. We want rich, flavorful gravy without introducing a bitter, overly dark roux.
Wake Up the Fond: Deglaze the Skillet
- Slowly pour in 2 cups of the water, whisking constantly as you pour. As the liquid hits the skillet, use a wooden spoon or silicone spatula to scrape the bottom and loosen those browned pork bits. Keep stirring until the liquid becomes smooth and all those flavorful browned pieces have been incorporated. If it looks lumpy at first, stay with it. Keep whisking. The roux is simply meeting the liquid and figuring itself out. 😂
Build the Brown Gravy: Now We’re Talking
- In a large measuring pitcher or bowl, whisk together the remaining 7 cups water, 1 cup McCormick Brown Gravy Seasoning Mix, 1 teaspoon Better Than Bouillon, 1 teaspoon black pepper, ½ teaspoon white pepper, ½ teaspoon dried thyme, and ¼ teaspoon sweet paprika. Whisk thoroughly until the gravy mix is evenly dispersed, then slowly pour the mixture into the skillet while whisking. Keep whisking until the gravy is smooth.
Add the Savory Finish: But Still Don’t Add Salt
- Add 1 tablespoon Worcestershire sauce and the remaining ½ teaspoon Better Than Bouillon, then stir thoroughly. Now stop. Do not add salt yet. The pork has already been dry-brined, the gravy mix is seasoned, the Better Than Bouillon is seasoned, and Worcestershire adds additional savory depth and seasoning. We’re going to taste before adding anything else.
Let the Gravy Come Together: Watch the Texture
- Bring the gravy to a gentle simmer over medium heat. You should see small bubbles forming around the edges and occasionally rising through the center. You do not want a hard rolling boil. Stir frequently for about 5 minutes. The gravy should begin to thicken and coat the back of a spoon rather than running off like water. Run your finger across the back of the spoon. If the line stays visible for a moment before slowly filling back in, you’re in a good place.
Taste the Gravy: This Is Your Salt Safety Check
- Take a small spoonful of gravy and let it cool for several seconds before tasting. You’re looking for deep savory flavor, balanced black and white pepper, subtle garlic, subtle onion, rich brown-gravy flavor, and enough seasoning to make those mashed potatoes start calling your name. You should not taste salt first. If the gravy tastes flavorful but slightly flat, don’t immediately add salt. The pork hasn’t gone in yet, and it will contribute additional flavor. If the gravy genuinely needs salt, add ¼ teaspoon kosher salt, stir thoroughly, and taste again. Continue only in ¼-teaspoon increments.
Transfer the Gravy to the Roasting Pan: Make Room for the Pork
- Pour the finished gravy into your oven-safe roasting pan and use your spatula to scrape every bit of gravy and those beautiful onions out of the skillet. Give the gravy a gentle stir once it’s in the roasting pan. Do not put the roasting pan on the stovetop unless it is specifically rated for direct stovetop use. We’re officially moving from stovetop flavor development to oven braising.
Arrange the Pork: Give Every Chop Some Gravy
- Gently place the browned pork chops into the gravy and arrange them in a mostly single layer if possible. A little overlapping is okay if 12 chops don’t quite fit perfectly, but avoid stacking them several layers deep. Spoon gravy over the tops of the pork chops. The chops should be surrounded by plenty of gravy. This is exactly why that big roasting pan is useful. Everybody gets room to settle into the gravy instead of fighting for space in a round pot. 😂
Cover It Up: This Is Our Tenderness Move
- Place the oven-safe lid securely on the roasting pan. You want the pan tightly covered so the moisture stays inside. The covered gravy creates a gentle, humid cooking environment around the pork, which is exactly what we’re after.
Into the Oven: Let the Gentle Heat Do the Work
- Carefully transfer the covered roasting pan to the 325°F oven. Bake for approximately 20 to 25 minutes before checking the pork. Because the chops are thin, do not assume they need a full hour in the oven. We’re checking rather than guessing.
Check the Pork: Let Your Thermometer Be Your Best Friend
- At about the 60-minute mark, carefully remove the lid. Insert an instant-read thermometer horizontally into the thickest part of one pork chop, avoiding the bone. For food safety, whole cuts of pork should reach 145°F, followed by a rest. Because these chops are thin, check several chops if possible, especially one from the center of the roasting pan and one from an outer edge. If the thickest part of the chops has reached 145°F and the meat feels tender, you’re ready to move on. If they’re below 145°F, cover the pan again and return it to the oven for another 5 minutes, then check again.
Check for Tenderness: Temperature Is Important, But Texture Matters Too
- Once the pork reaches 145°F, gently test one chop with a fork. You’re looking for meat that gives easily when pressed. It should not feel rubbery or resistant. If it has reached a safe temperature but still feels firmer than you’d like, return the covered pan to the oven for 10 minute increments until its tender how you want it to be. Keep the oven at 325°F. Do not increase the temperature to hurry things along. With thin chops, aggressive heat is more likely to push the meat toward dryness than magically make it tender.
Give the Gravy Its Final Southern Glow-Up: Adjust Slowly
- Once the pork is tender, remove the roasting pan from the oven and carefully uncover it. Taste the gravy again. This is the important final tasting because the pork has now contributed its juices and flavor. If the gravy needs salt: Add kosher salt in ¼-teaspoon increments, stirring and tasting after each addition. If the gravy needs more brown-gravy flavor: Whisk 1 tablespoon McCormick Brown Gravy Seasoning Mix with 2 tablespoons cold water in a small bowl until smooth, then stir it into the gravy and let it simmer in the hot gravy for 2 to 3 minutes. Taste again before adding more. If the gravy is too thick: Add hot water ¼ cup at a time, stirring after each addition. If the gravy is too thin: Leave the roasting pan uncovered for several minutes and allow the hot gravy to reduce slightly. If the gravy tastes right but needs a little richness: Stir in 1 tablespoon unsalted butter until completely melted. That final butter is not supposed to make the gravy taste buttery. It’s there to round out the flavor and give the gravy a smooth, finished mouthfeel.
Let Everything Rest: Give It a Minute
- Leave the pork chops sitting in the gravy for approximately 10 minutes, with the lid slightly ajar. This gives the meat a chance to rest and allows the gravy to settle into its final consistency. The gravy may look a little thinner when it’s piping hot and thicken slightly as it rests. That’s completely normal.
Plate It Like Somebody’s Coming Back for Seconds
- Place one pork chop on each plate and spoon an unapologetically generous amount of brown gravy over the top. Then give those mashed potatoes the attention they deserve and spoon plenty of gravy over them too. Yes, more. We made all this gravy for a reason. If using parsley, sprinkle a small amount over the finished dish for a little freshness and color. Serve immediately.
Notes
- The oven method is intentional: The pork is browned and the gravy is developed on the stovetop, then everything moves to a covered roasting pan for gentle oven braising. This keeps the flavor-building steps on the stovetop while giving the pork an evenly heated, spacious environment for the final cooking stage.
- Make sure the roasting pan is oven-safe: The pan and lid should be rated for at least 325°F. Do not use the roasting pan directly on a stovetop unless the manufacturer specifically states that it is stovetop-safe.
- The pork cut matters: This recipe is designed specifically for thin, bone-in pork chops approximately ½ to ¾ inch thick. If your chops are thinner, begin checking them earlier.
- Don’t skip the overnight dry brine: If you have the time, use it. It gives the salt time to penetrate the meat and helps the pork retain moisture during cooking.
- Pork drippings are welcome: If the chops leave flavorful drippings behind in the skillet, use them as part of the ⅓ cup fat needed for the roux. Supplement with canola oil as necessary.
- The gravy is intentionally adjustable: Start with ¾ cup McCormick Brown Gravy Seasoning Mix and keep the remaining ¼ cup available. This gives you control over the final flavor intensity and saltiness.
- Don’t judge the gravy while it’s scorching hot: Let a spoonful cool for several seconds before tasting. Hot food can make it much harder to accurately judge seasoning.
- Don’t boil the pork: The oven temperature is deliberately moderate. The covered gravy provides the moisture, while the 325°F oven provides steady, surrounding heat. Don’t increase the oven temperature just to make dinner move faster.
- Temperature beats the clock: The cooking time is a guide, not a commandment. Thin pork chops vary in thickness, so start checking around 20 minutes and use an instant-read thermometer to determine when they’re ready.
- For maximum gravy: If your roasting pan is large enough, the chops should sit in a generous pool of gravy rather than being tightly packed. This is exactly what we want for serving over mashed potatoes.
- Serving: These pork chops were made for mashed potatoes. A crisp green salad alongside them balances the richness beautifully.
- Make-ahead: The pork can be cooked earlier in the day and gently reheated in its gravy. If the gravy thickens substantially after refrigeration, loosen it with a splash of water and reheat gently.
- Leftovers: Refrigerate within 2 hours in a shallow airtight container. Reheat gently, adding a splash of water if the gravy has thickened.